QuickBookingQuickBooking
Full-stack appointment booking script with intuitive client portal, comprehensive staff dashboard, multi-language support. ManageQuickBooking
Full-stack appointment booking script with intuitive client portal, comprehensive staff dashboard...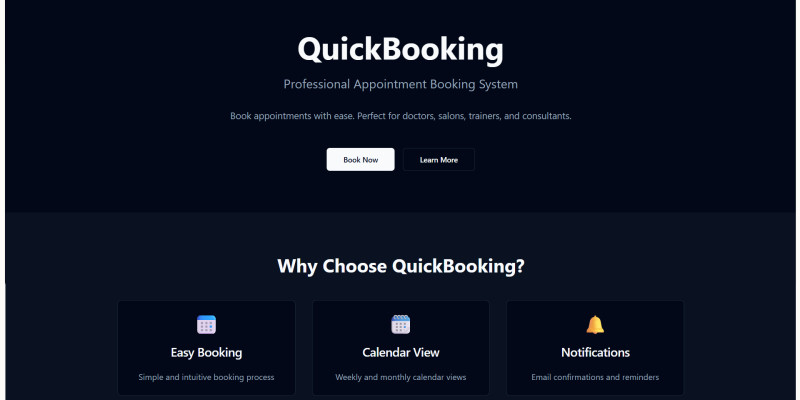
Screenshots


Overview
Elevate Your Business with a Comprehensive Full-Stack Appointment Booking System!
Built with a cutting-edge and modern tech stack, this robust web application provides a complete solution for managing appointments, streamlining operations, and enhancing customer experience. It offers both a seamless front-end for your clients and a powerful, easy-to-use back-end for your staff.
Key Features Include:
- Effortless Client Booking Portal: A clean and responsive interface allows customers to easily select services, choose available dates and times from a clear calendar view, and confirm their appointments in just a few clicks.
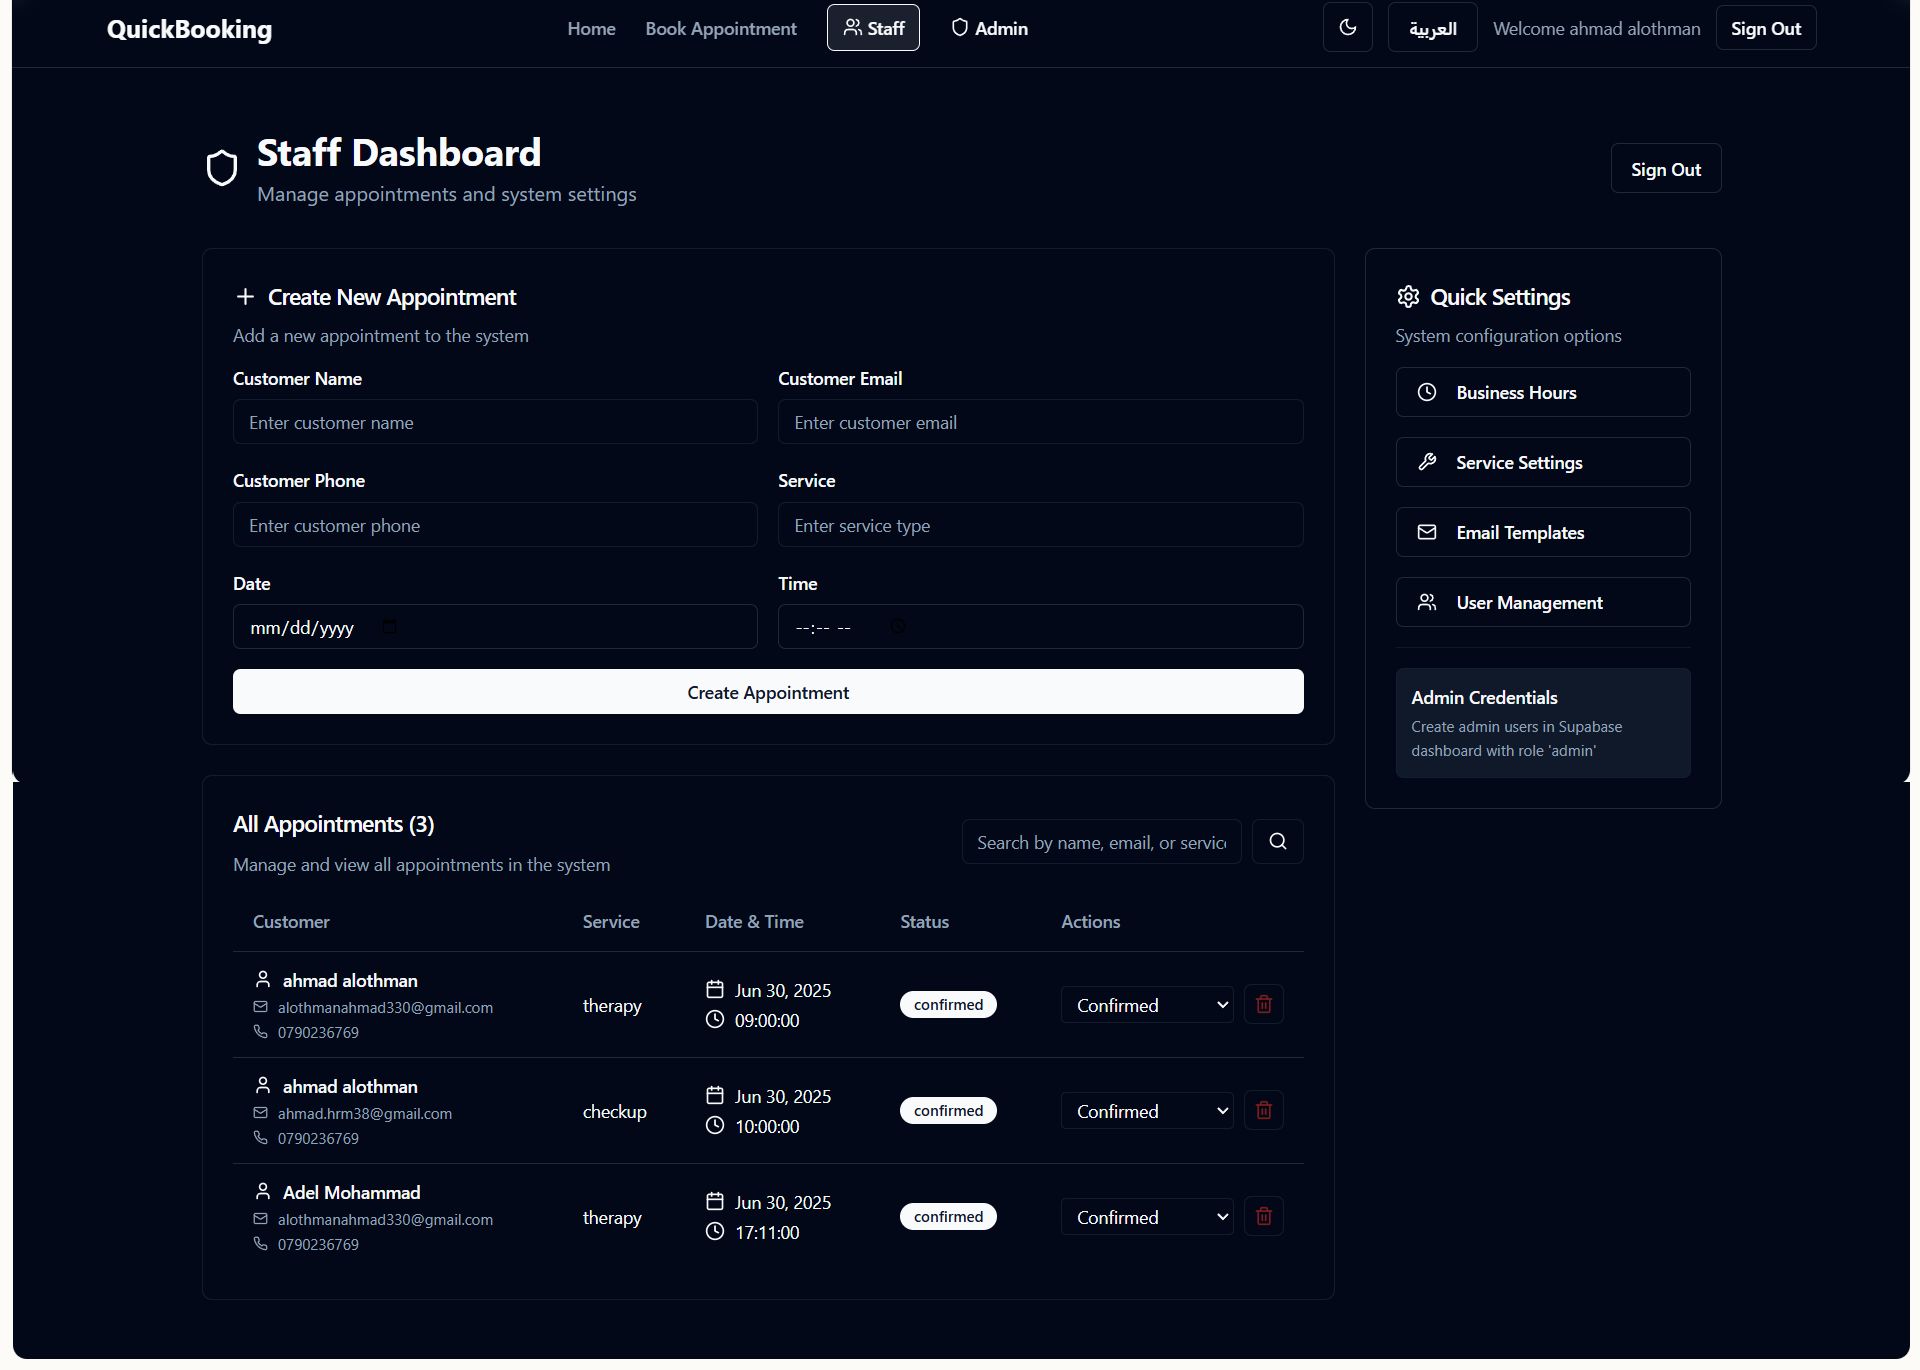
- Powerful Staff & Admin Dashboard: Gain full control over your scheduling with a comprehensive backend. Manage all appointments, view client details, confirm/edit/delete bookings, and update their status.
- Service & Time Slot Management: Easily configure your services, set working hours, and manage available time slots to suit your business needs.
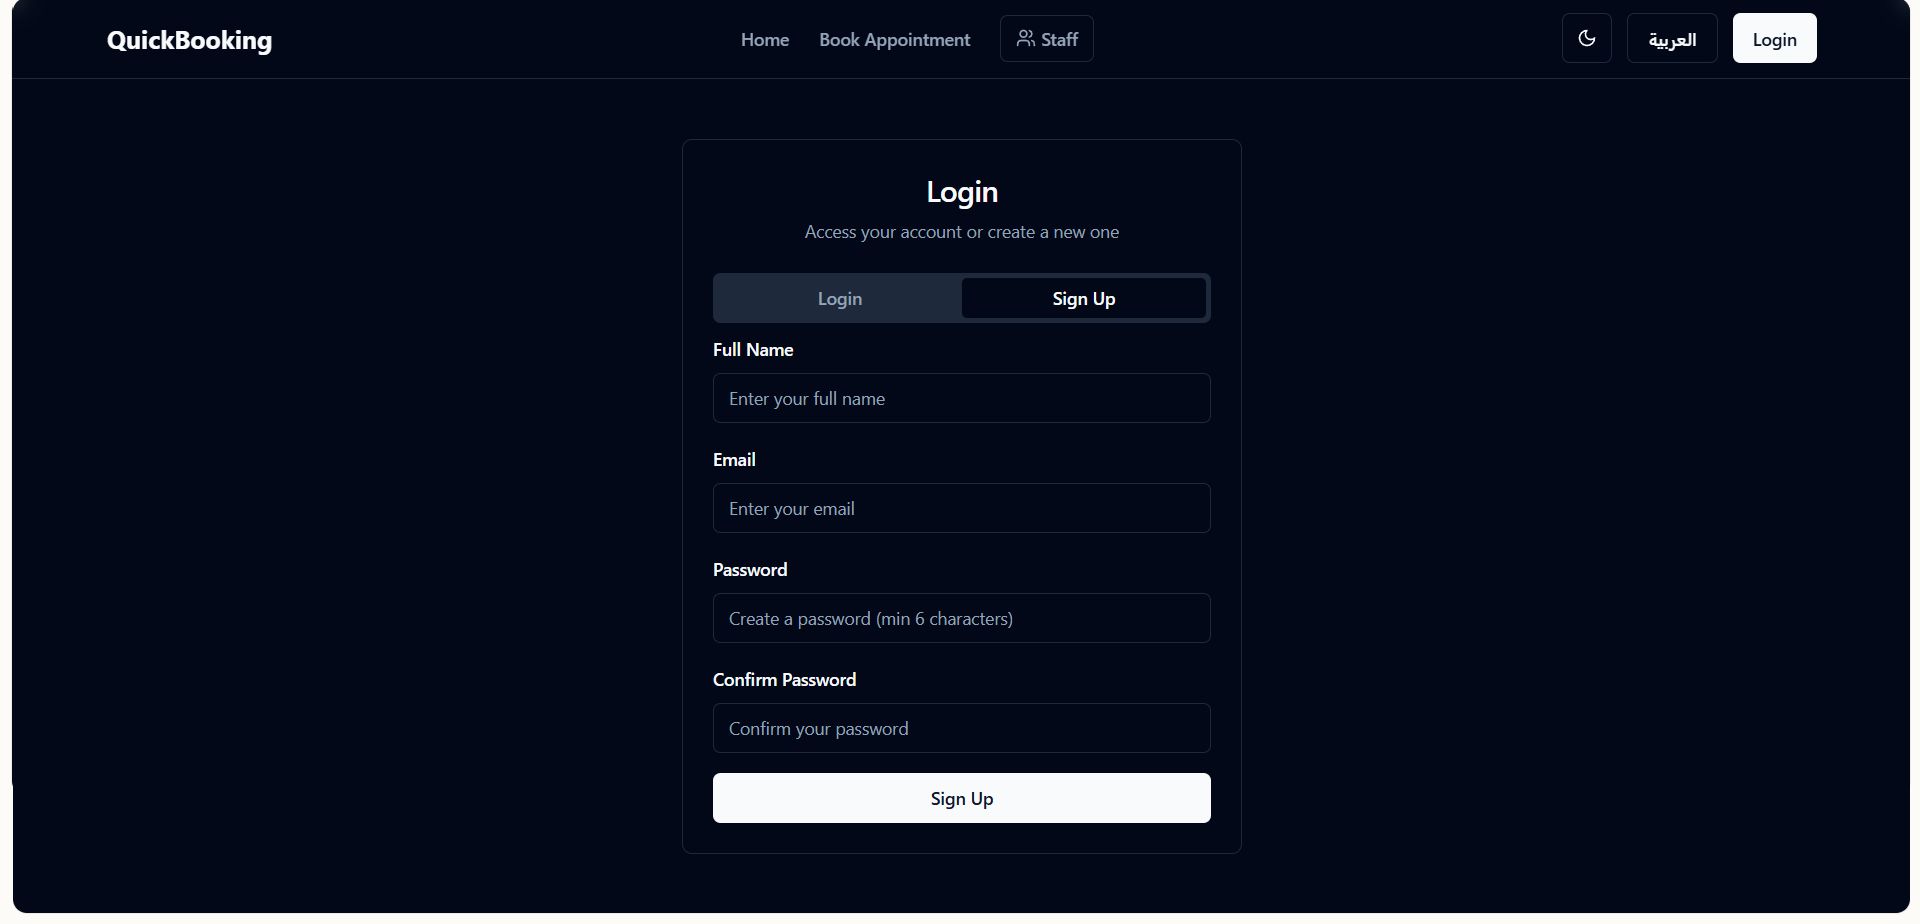
- User Authentication System: Secure login and registration for both clients and staff ensures data privacy and controlled access.
- Multi-Language Support: Reach a wider audience with built-in multi-language capabilities (e.g., Arabic, English shown).
- Modern & Responsive Design: Optimized for all devices, ensuring a consistent user experience whether on desktop, tablet, or mobile.
Why Choose This Script?
- State-of-the-Art Technologies: Built with the latest and most popular frameworks, ensuring high performance, scalability, and maintainability.
- Time & Cost Saving: Get your online booking system up and running quickly without the need for extensive custom development.
- Scalable & Customizable: Developed with clean, modular code, making it easy to understand, modify, and extend to fit specific business requirements.
- User-Friendly Interface: Designed with both the end-user and administrator in mind, ensuring a smooth and efficient workflow.
- Deployment Ready: Easily deployable on platforms like Vercel and Netlify.
Perfect for various service-based businesses: Salons, clinics, consulting firms, fitness studios, educational institutions, and more!
Invest in this professional appointment booking solution and empower your business with efficient scheduling and superior customer service.
Technologies Used:
- Frontend: React + TypeScript
- Styling: Tailwind CSS + shadcn-ui
- Build Tool: Vite
- Backend: Supabase (PostgreSQL + Auth)
- Deployment: Vercel/Netlify ready
Features
Here's a detailed list of features you can use. Adapt and expand based on any other functionalities your system has.
I. General & Core Features:
- Full-Stack Application: A complete web solution covering both frontend and backend functionalities.
- Modern & Responsive Design: Optimized for seamless performance and display across all devices (desktops, tablets, mobiles).
- Multi-Language Support: Easily switch between languages (e.g., Arabic, English) to cater to a diverse user base.
- Clean & Intuitive User Interface (UI): Designed for ease of use for both clients and staff.
- Scalable Architecture: Built with modern technologies (React, Supabase) for easy expansion and handling of increased loads.
- Easy Deployment: Ready for deployment on popular platforms like Vercel and Netlify.
II. Client-Side Features (Frontend - User Experience):
- Effortless Appointment Booking: Simple, step-by-step process for clients to book appointments.
- Service Selection: Clients can easily browse and select from available services.
- Interactive Calendar View: Clear calendar interface to check available dates and time slots.
- Real-time Availability: Shows only available slots to prevent double bookings.
- Client Information Form: Secure collection of necessary details (name, email, phone) during booking.
- Appointment Confirmation: (If implemented) Instant confirmation upon successful booking.
- User Account Creation/Login: Clients can create accounts to manage their past and upcoming appointments.
- View Booked Appointments: Registered clients can view their appointment history and upcoming bookings.
III. Staff / Admin Dashboard Features (Backend - Management & Control):
- Comprehensive Dashboard Overview: A central hub to monitor daily operations and key metrics.
- Appointment Management:
- View All Appointments: See a comprehensive list of all scheduled bookings.
- Add New Appointments: Manually create appointments for clients.
- Edit Appointment Details: Modify existing appointment information (date, time, service, client details).
- Update Appointment Status: Change appointment status (e.g., Confirmed, Pending, Completed, Canceled).
- Delete Appointments: Remove appointments from the system.
- Search & Filter: Easily find specific appointments by client name, date, service, or status.
- Service Management:
- Add/Edit/Delete Services: Full control over the services offered, including names, descriptions, and durations.
- Schedule & Working Hours Management:
- Set Business Hours: Define daily/weekly working hours.
- Manage Staff Availability: (If applicable for multiple staff) Set individual staff schedules.
- Block Time Slots: Mark specific times as unavailable (e.g., for breaks, meetings).
- User Management (Admin Credentials):
- Manage Staff Accounts: (If applicable) Create, edit, and manage staff user accounts.
- Manage Client Accounts: View and manage registered client profiles.
- Email Templates (Notifications): (Based on your "Email Templates" in the image)
- Customizable Email Notifications: Ability to customize templates for appointment confirmations, reminders, etc.
- Automated Notifications: Send automated emails to clients and/or staff.
IV. Technical Features (Under the Hood):
- Frontend: React + TypeScript (for robust, maintainable, and scalable UI development).
- Styling: Tailwind CSS + shadcn-ui (for modern, utility-first CSS and beautiful, accessible UI components).
- Build Tool: Vite (for lightning-fast development experience and optimized builds).
- Backend & Database: Supabase (utilizes PostgreSQL for powerful relational database management and Supabase Auth for secure user authentication).
- API Management: (Mention if you're using RESTful APIs or GraphQL for communication).
- Code Quality: Clean, modular, and well-structured code.
- Deployment Ready: Pre-configured for easy deployment on Vercel and Netlify (popular serverless platforms).
Requirements
To successfully set up and run this full-stack appointment booking system, you will need the following:
I. For the Backend (Supabase):
- Supabase Account: Access to a Supabase project. This will host your PostgreSQL database and manage user authentication.
- Note: Supabase offers a generous free tier for getting started.
- Supabase Project Configuration:
- API Keys: Your Supabase Project URL and Public API Key (anon key) will be required.
- Database Setup: The necessary database tables and schema (instructions should be provided in your documentation).
- Authentication Setup: Supabase Auth is used, so ensure its settings are configured as per your documentation.
II. For the Frontend (React + Vite):
- Node.js: Version 16.x or higher (LTS recommended) installed on your local development machine. This is required for running
npmoryarncommands. - npm or Yarn: A package manager (npm usually comes with Node.js, or you can install Yarn).
- Code Editor: A text editor or IDE like VS Code is highly recommended for working with the codebase.
III. Deployment (Frontend Hosting):
- Vercel Account OR Netlify Account: An account on either of these platforms is recommended for easy deployment of the React frontend.
- Note: Both offer free tiers suitable for many projects.
- Git Repository: The project should be connected to a Git repository (e.g., GitHub, GitLab, Bitbucket) for seamless deployment with Vercel/Netlify.
IV. General Requirements:
- Basic Understanding of Web Development: Familiarity with JavaScript, React concepts, and environment variables is beneficial for customization.
- Internet Connection: Required for installing dependencies, connecting to Supabase, and deployment.
V. Environment Variables:
- You will need to set up environment variables (e.g., in a
.envfile for local development and in your deployment platform's settings) for:VITE_SUPABASE_URLVITE_SUPABASE_ANON_KEY- (Any other sensitive API keys or configurations specific to your app)
Instructions
This guide will walk you through the necessary steps to set up and deploy your full-stack appointment booking system.
I. Prerequisites:
Before you begin, ensure you have the following installed on your development machine:
- Node.js: Version 16.x or higher (LTS recommended). Download from
- nodejs.org.
- npm (Node Package Manager) or Yarn: npm comes bundled with Node.js.
- Git: Installed and configured.
- Code Editor: A text editor like VS Code is highly recommended.
II. Supabase Backend Setup:
Your application uses Supabase for its backend (Database & Authentication).
- Create a Supabase Project:
- Go to
- Supabase.com and create a new account or log in.
- Click "New Project" and follow the instructions to create a new project.
- Crucial: Note down your Project URL and your
anon(public) API Key from your Project Settings > API section. You will need these for your frontend configuration.
- Database Schema Setup:
- You will need to import the required database tables and initial data into your Supabase project.
- [Important: You MUST provide an SQL script (e.g.,
schema.sqlordatabase.sql) with your project files that includesCREATE TABLEstatements for all necessary tables (e.g.,services,appointments,users).] - Go to your Supabase project dashboard > SQL Editor.
- Create a new query and paste the content of your
[Your_Project_Name]_schema.sqlfile (or similar) here, then click "Run". - [Optional but Recommended: Provide an SQL script for initial seed data if your app requires it for testing/demo.]
- Authentication Configuration:
- Supabase handles authentication. Ensure the "Email Provider" is enabled in your Supabase project dashboard > Authentication > Providers.
- [Optional: If you use other providers like Google/GitHub, mention configuring them here.]
III. Frontend Application Setup (React + Vite):
- Clone the Repository:
- Open your terminal or command prompt.
- Navigate to the directory where you want to store your project.
- Run:
git clone [Your_Repository_URL_Here] - Navigate into the project directory:
cd [Your_Project_Folder_Name]
- Install Dependencies:
- In the project root directory, run:
npm install(oryarn install)
- In the project root directory, run:
- Configure Environment Variables:
- Create a file named
.envin the root of your project directory. - Add your Supabase API keys to this file:
<code>
VITE_SUPABASE_URL="YOUR_SUPABASE_PROJECT_URL"
VITE_SUPABASE_ANON_KEY="YOUR_SUPABASE_ANON_PUBLIC_KEY"
</code>
- Create a file named
<strong>Replace <code>YOUR_SUPABASE_PROJECT_URLandYOUR_SUPABASE_ANON_PUBLIC_KEYwith the actual values obtained from your Supabase project.
<br><br><br><strong>Run in Development Mode:</strong><br><br>After installing dependencies and configuring <code>.env, run: npm run dev (or yarn dev)<br>###licode###http://localhost:5173 (or a similar port). You can now access and test the application locally.
IV. Deployment to Vercel/Netlify:
This application is optimized for easy deployment on modern hosting platforms.
- Push to Git Repository:
- Ensure your local project is committed and pushed to a remote Git repository (e.g., GitHub, GitLab, Bitbucket).
- Deploy with Vercel:
- Go to
- Vercel.com and log in.
- Click "Add New..." -> "Project".
- Import your Git repository. Vercel will usually auto-detect the Vite/React setup.
- During deployment configuration, remember to set your Environment Variables:
VITE_SUPABASE_URLVITE_SUPABASE_ANON_KEY
- Click "Deploy". Vercel will build and deploy your application.
- Deploy with Netlify:
- Go to
- Netlify.com and log in.
- Click "Add new site" -> "Import an existing project".
- Connect to your Git repository. Netlify will usually auto-detect the Vite/React setup.
- During deployment configuration, set your Environment Variables:
VITE_SUPABASE_URLVITE_SUPABASE_ANON_KEY
- Click "Deploy site". Netlify will build and deploy your application.
V. Post-Deployment (Initial Admin Setup):
- Once deployed, you will likely need to register your first admin/staff user.
- [Crucial: Provide clear instructions here on how to create the initial admin account. For example, "Navigate to the
/registerpage and create an account. This account will automatically be assigned admin privileges upon first registration" OR "You can manually set a user as admin through the Supabase database table (e.g.,userstable, setis_adminto true)." - Choose whichever applies to your system].
| Category | Scripts & Code / NodeJS |
| First release | 20 June 2025 |
| Last update | 20 June 2025 |
| Files included | .css, .html, Javascript .js |
| Tags | responsive, business, modern, management, dashboard, Calendar, Database, notifications, admin panel, user management, booking, scheduling, backend, service, appointment, reservation, web app, frontend, typescript, online booking, react, SaaS, tailwind css, vite, postgresql, supabase, full stack, staff dashboard, client portal, quickbooking, email templates, netlify, vercel |