Smart Accounting SystemSmart Accounting System
Comprehensive accounting system built with Laravel 10 backend and Vue.js 3 frontendSmart Accounting System
Comprehensive accounting system built with Laravel 10 backend and Vue.js 3 frontend
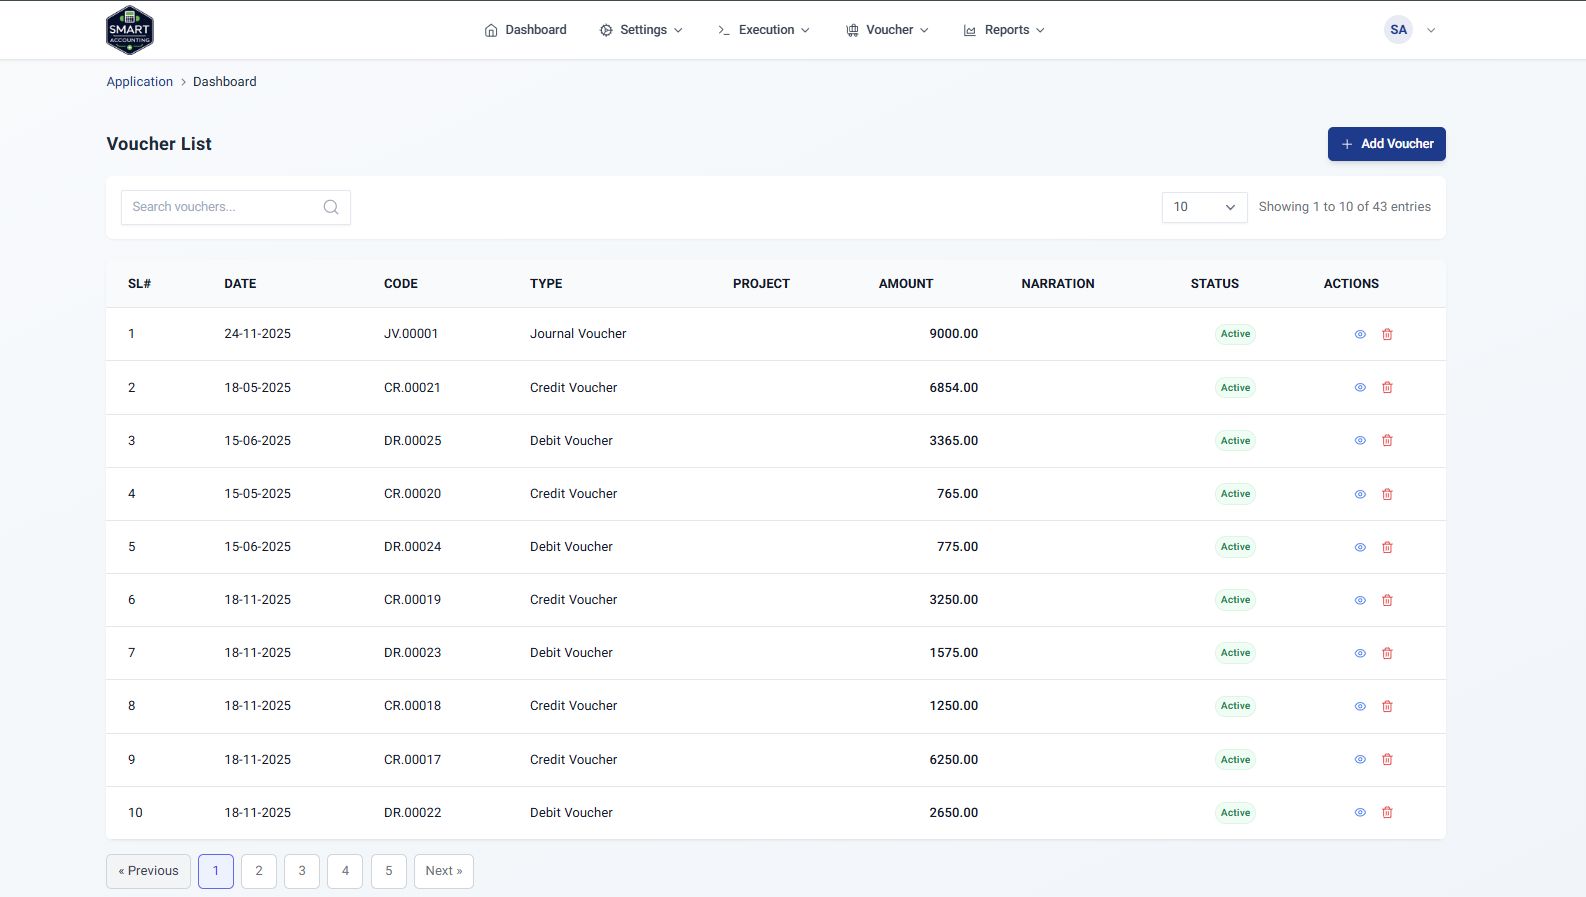
Screenshots


Overview
This accounting system provides a complete solution for managing financial operations including ledger management, financial reporting, and more. The application follows modern development practices with a clean separation between backend API and frontend interface.
Backend Architecture
Laravel 10 with API-centric design, repository pattern, service layers, and comprehensive validation.
Frontend Architecture
Vue.js 3 with Composition API, modular structure, and modern UI components.
Database Design
MySQL database with well-structured tables for accounting operations and financial reporting.
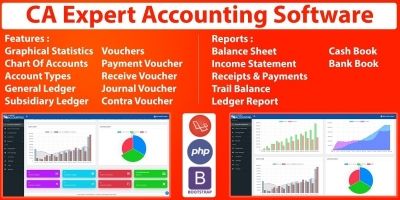
Features
System Features
Comprehensive accounting and financial management capabilities
Accounting Features
- Chart of Accounts management with hierarchical structure
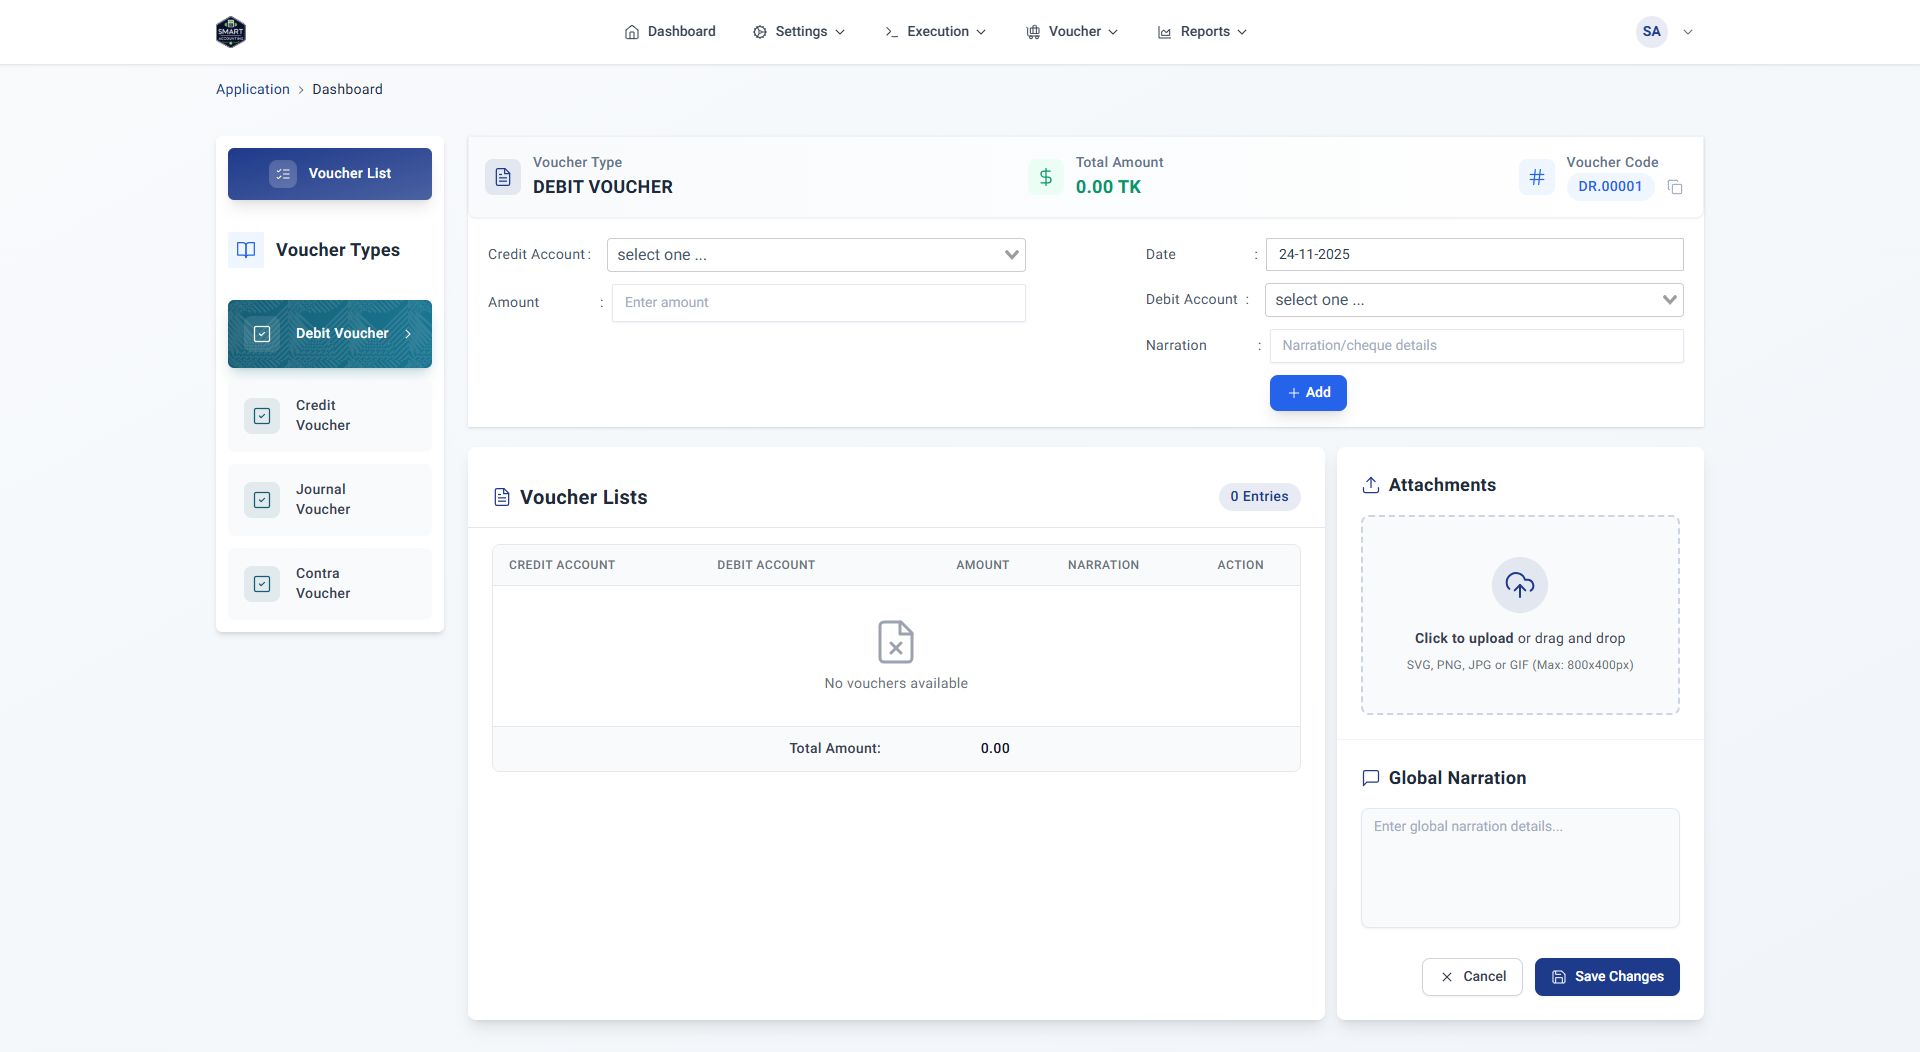
- Multi-type voucher system (Debit, Credit, Journal, Contra)
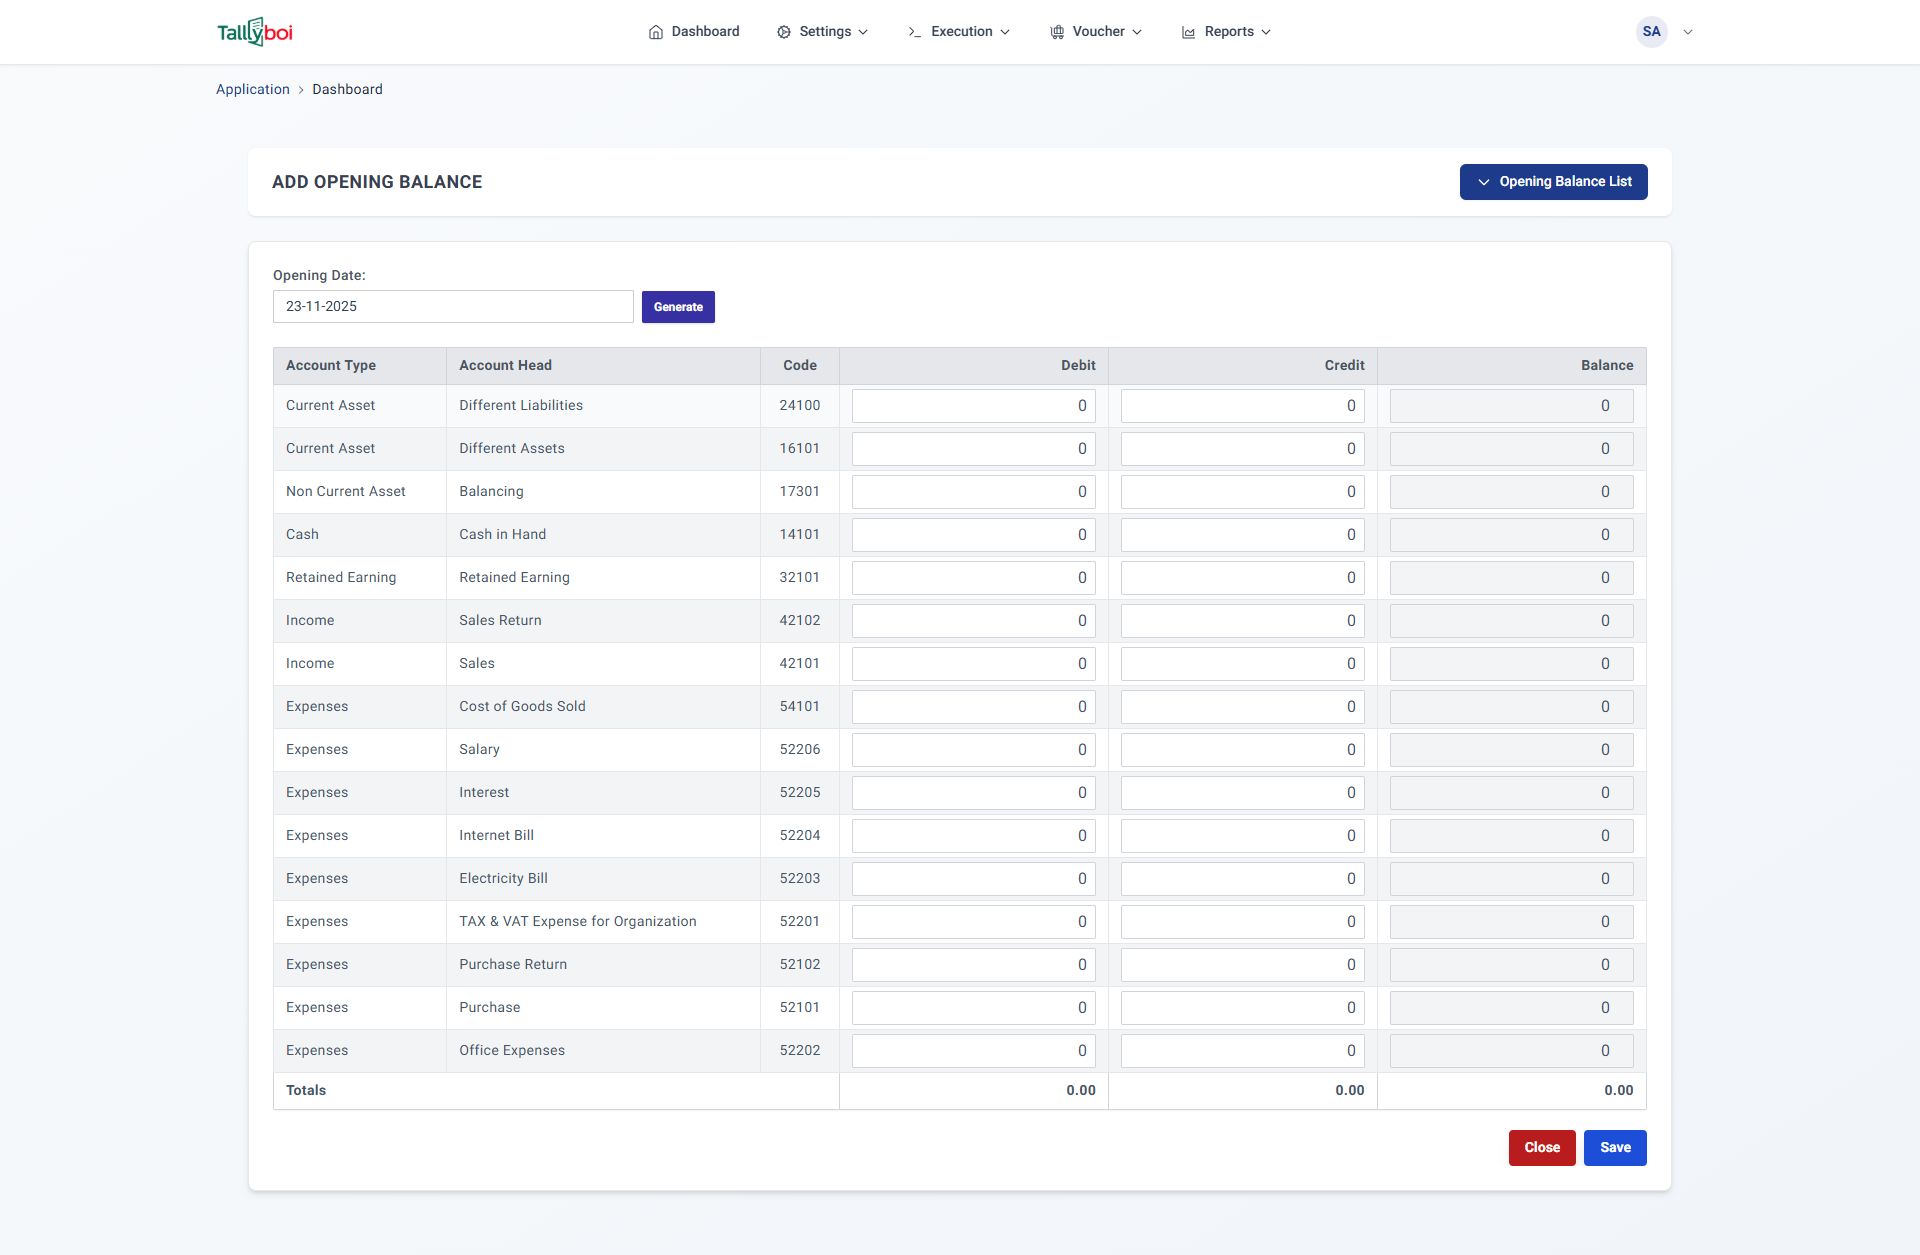
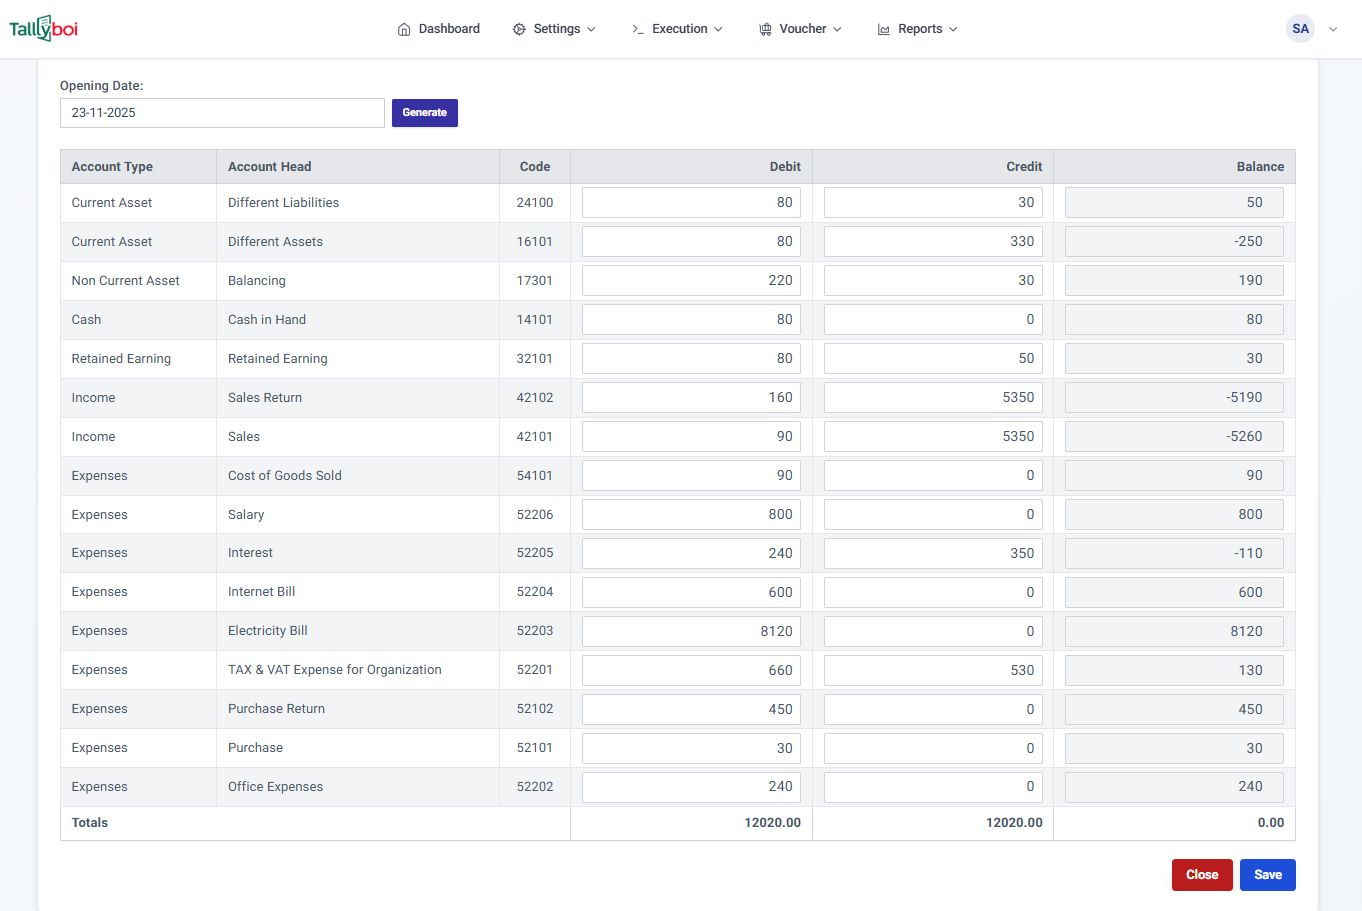
- Opening Balance management for ledger accounts
- Year-end processing and fiscal closure
- Automatic voucher numbering system
- Multiple entry support within single vouchers
Reporting Features
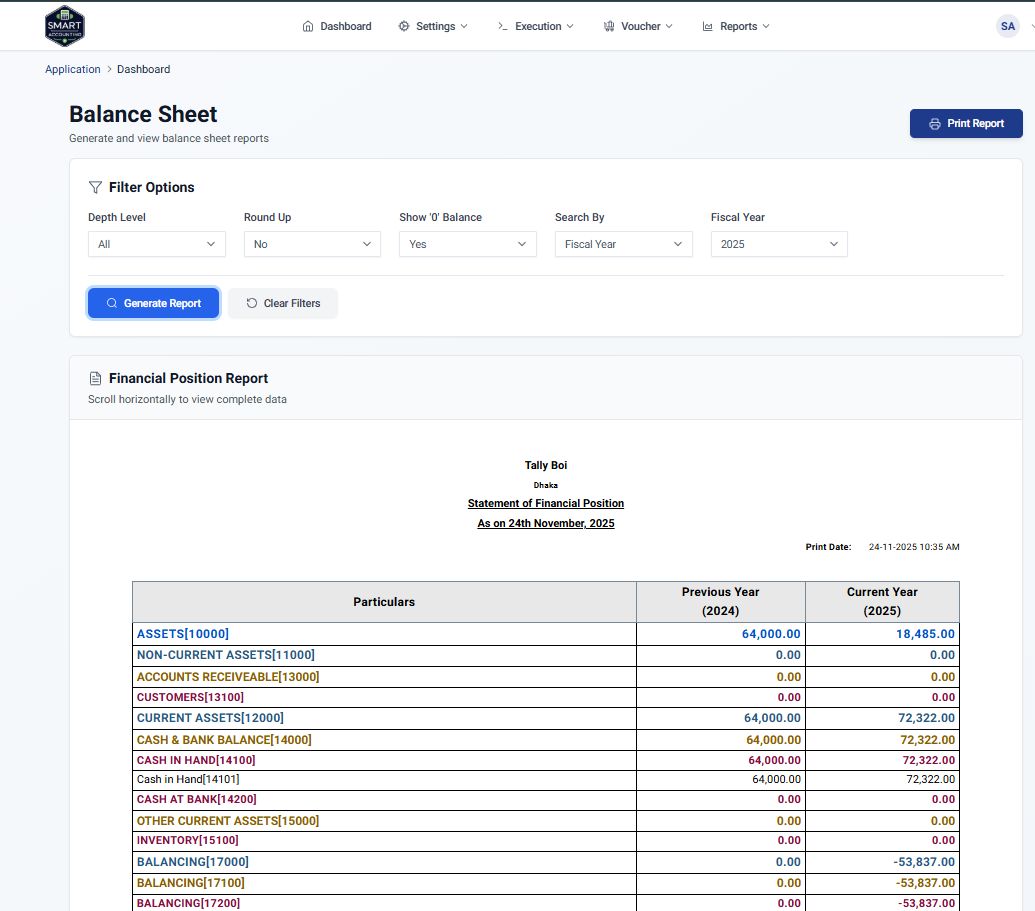
- Balance Sheet Report
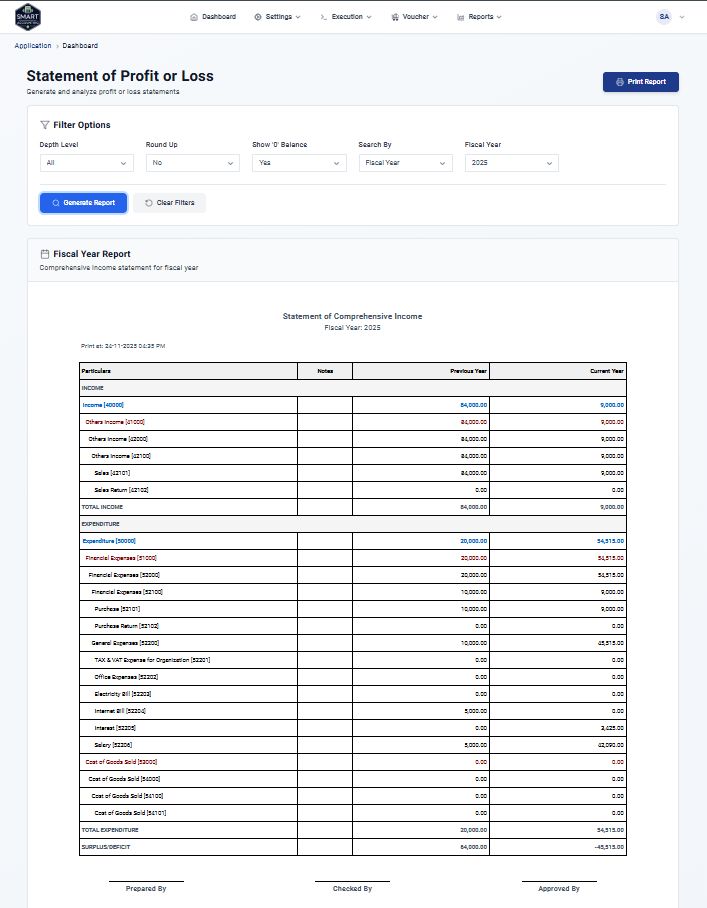
- Statement of Profit or Loss
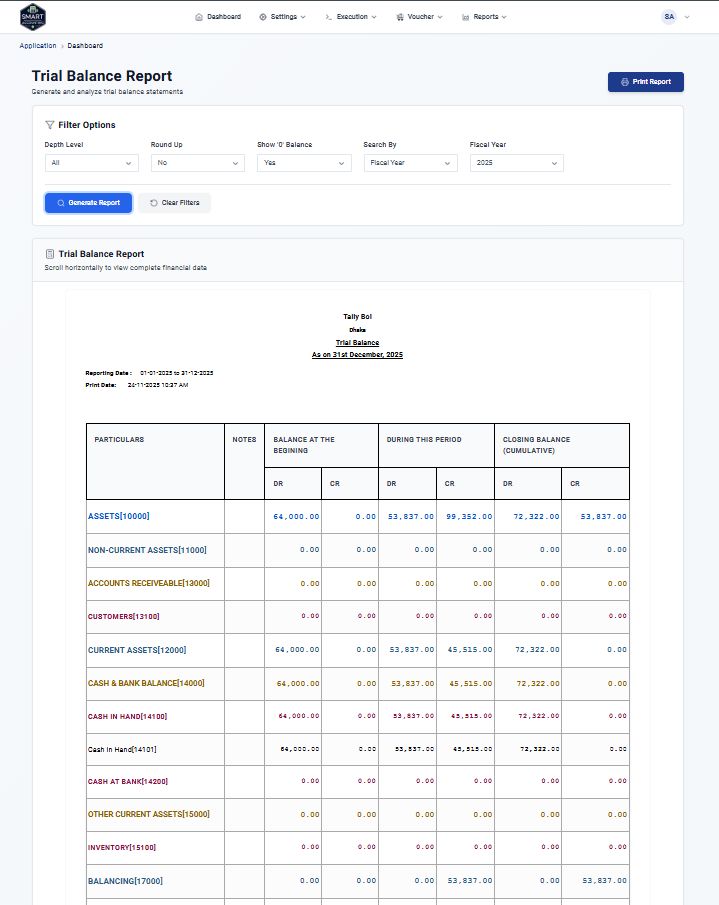
- Trial Balance verification reports
- Ledger Reports with transaction history
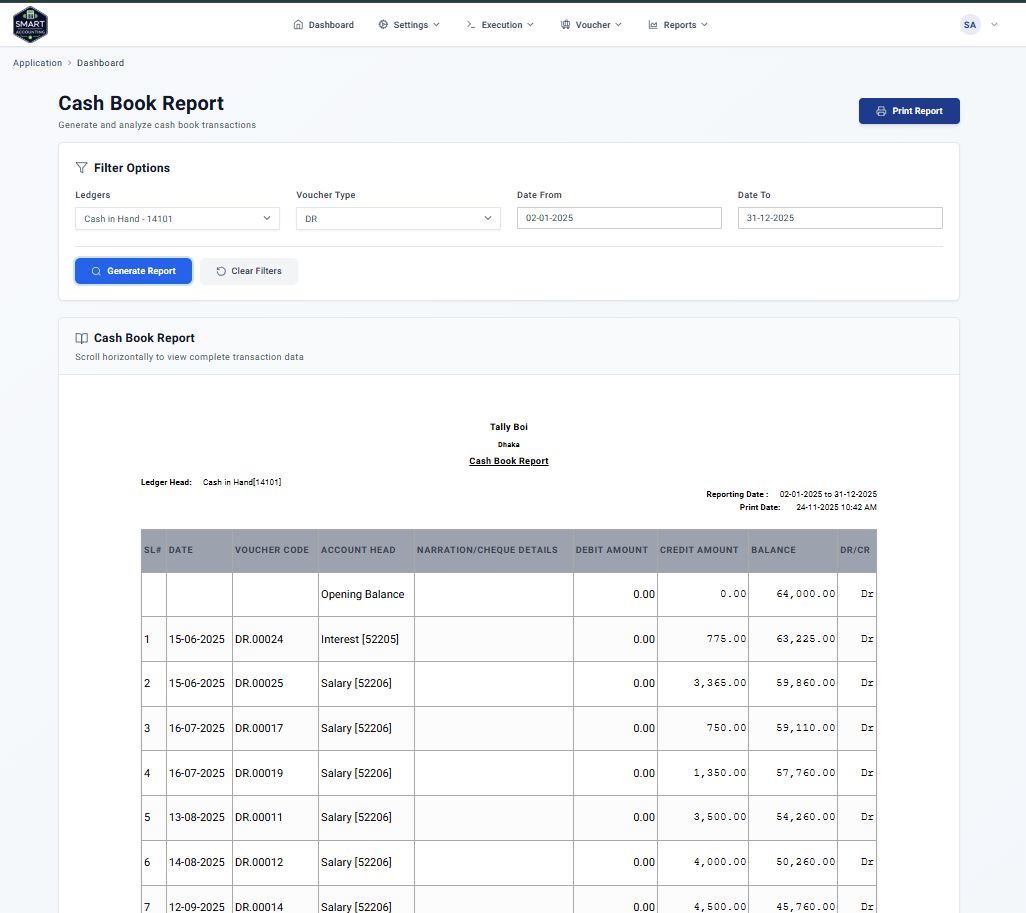
- Cash Book and Bank Book reports
- Date range filtering for custom periods
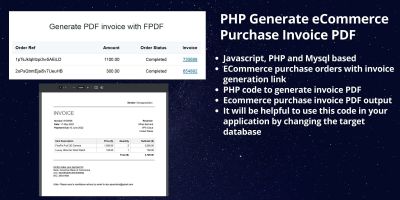
- PDF and Excel export capabilities
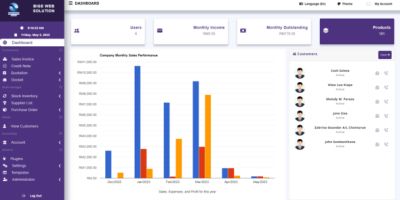
Dashboard Features
- Real-time financial overview with key metrics
- Voucher type analytics (Debit, Credit, Journal, Contra)
- Income vs Expense tracking with dual view:
- Fiscal Year view - Yearly comparison across multiple fiscal periods
- Current Year view - Monthly breakdown for the current fiscal year
- Financial Position (Assets & Liabilities) tracking with dual view:
- Fiscal Year view - Historical comparison across fiscal periods
- Current Year view - Monthly progression for the current fiscal year
- Interactive charts and financial insights
Requirements
Technology Stack
Modern technologies powering the application
| Component | Technology | Purpose |
|---|---|---|
| Backend Framework | Laravel 10 | API development, business logic, data processing |
| Frontend Framework | Vue.js 3 | User interface, client-side logic |
| Database | MySQL | Data storage and retrieval |
| Authentication | Laravel Sanctum | API token-based authentication |
| UI Framework | Tailwind CSS | Styling and responsive design |
| Build Tool | Vite | Frontend asset compilation and bundling |
Installation Setup
Complete guide to install and configure TallyBoi Accounting System in development and production environments
Minimum System Requirements
| Component | Minimum | Recommended |
|---|---|---|
| PHP | 8.1 | 8.2+ |
| Node.js | 18.0 | 20.0+ |
| Database | MySQL 5.7 | MySQL 8.0 |
Prerequisites
Backend Requirements
PHP 8.1+, Composer 2.0+, MySQL 5.7+, PHP extensions (mbstring, xml, curl, pdo, openssl)
Frontend Requirements
Node.js 18+, npm 9+, Modern browser (Chrome 90+, Firefox 88+, Safari 14+)
Instructions
Step 1: Extract and Prepare Project
Extract the project files:
Extract the downloaded accounting-system.zip file to your desired location using your preferred extraction tool (Windows: right-click → Extract, Mac: double-click, Linux: use Archive Manager).
Navigate to the project directory:
Step 2: Backend Setup (Laravel)
Navigate to backend directory:
Install PHP dependencies:
Environment configuration:
cp .env.example .env
# Generate application key
php artisan key:generate
# Edit .env file with your database credentials
nano .env
Configure your database in .env file:
DB_CONNECTION=mysql
DB_HOST=127.0.0.1
DB_PORT=3306
DB_DATABASE=your_database_name
DB_USERNAME=your_mysql_username
DB_PASSWORD=your_mysql_password
Database setup:
Create a database with the same name as configured in your .env file using your preferred database management tool (phpMyAdmin, MySQL Workbench, command line, etc.).
php artisan migrate --seed
# Generate storage link
php artisan storage:link
Start development server:
php artisan serve
# Server will run at: http://localhost:[PORT]
# Note: Replace [PORT] with your actual port number (usually 8000)
Step 3: Frontend Setup (Vue.js 3 + TypeScript)
Navigate to frontend directory:
Install JavaScript dependencies (this may take several minutes):
Environment configuration:
cp .env.example .env
# Edit .env file with your database credentials
nano .env
Configure your frontend .env file:
VITE_API_BASE_URL=http://localhost:[BACKEND_PORT]
Start development server:
npm run dev
# Server will run at: http://localhost:[FRONTEND_PORT]
# Note: Replace [FRONTEND_PORT] with your actual port number (usually 5173 or 3000)
Build for production:
npm run build
# Preview production build
npm run preview
Note about dependencies:
The project uses extensive UI libraries including:
Ant Design Vue
UI component library
Pinia
State management
Tabulator
Advanced data tables
Chart.js
Data visualization
Access the application:
Frontend Application
http://localhost:[FRONTEND_PORT]
Backend API
http://localhost:[BACKEND_PORT]/api
Super Admin Login
[email protected] / 12345678
API Documentation
http://localhost:[BACKEND_PORT]/api/documentation
Environment Variables Reference
APP_NAME="Accounting System"
APP_ENV=production
APP_KEY=base64:your-generated-key-here
APP_DEBUG=false
APP_URL=https://yourdomain.com
# Database Configuration
DB_CONNECTION=mysql
DB_HOST=127.0.0.1
DB_PORT=3306
DB_DATABASE=your_database_name
DB_USERNAME=your_mysql_username
DB_PASSWORD=your_mysql_password
# Frontend (.env)
VITE_APP_NAME="Accounting System"
VITE_API_BASE_URL=https://yourdomain.com/api
VITE_APP_URL=https://yourdomain.com
Development Scripts Reference
| Command | Purpose |
|---|---|
npm install |
Install frontend dependencies |
composer install |
Install backend dependencies |
npm run dev |
Start frontend development server |
php artisan serve |
Start backend development server |
php artisan migrate |
Run database migrations |
php artisan migrate --seed |
Run migrations with sample data |
npm run build |
Build production bundle |
Auto Installation
Fully automated setup with database auto-creation and migrations
Prerequisites - Local Server Setup
WAMP Server
Download and install WAMP Server from official website
XAMPP Server
Download and install XAMPP from Apache Friends
Step-by-Step Installation Process
Step 1: Extract Project to Local Server
Extract the project files to your local server's web directory:
C:wamp64wwwaccounting-system
# For XAMPP Server
C:xampphtdocsaccounting-system
Step 2: Start Local Server
Start your WAMP/XAMPP server and ensure all services are running:
- Apache Server (green indicator)
- MySQL Server (green indicator)
- PHP 8.2+ enabled
Step 3: Run Auto Installer
Open your web browser and navigate to the installer:
Step 1: System Requirements Check
System Check: The installer automatically verifies all required PHP extensions, Composer, Node.js, and system requirements.
Step 4: Database Configuration
Enter your MySQL credentials - the installer will automatically create the database:
| Field | Typical Value | Description |
|---|---|---|
| Database Host | localhost | Your local MySQL server |
| Database Port | 3306 | Default MySQL port |
| Database Name | accounting_system | Will be auto-created if it doesn't exist |
| Database Username | root | Default MySQL username |
| Database Password | (leave empty) | Default is empty for local development |
Step 2: Database & Fiscal Year Configuration
Auto Database Creation: The installer automatically creates the database if it doesn't exist using your MySQL credentials.
Step 5: Installation Progress
Watch the real-time installation process with detailed logs:
Step 3: Real-time Installation Progress
The installer automatically performs all these tasks:
- PHP Version 8.2+
- Required PHP extensions (pdo, mbstring, etc.)
- Composer availability
- Node.js and npm availability
Database Setup
- Test database connection
- Auto-create database if not exists
- Configure environment files
Backend Installation
- Install Composer dependencies
- Generate Laravel application key
- Create storage link
- Run database migrations
- Seed initial data
Frontend Configuration
- Configure frontend environment
- Set API base URL
Final Setup
- Mark installation as complete
- Set up fiscal year configuration
Smart Installation: The installer uses modular architecture with separate files for configuration, requirements checking, database operations, and installation logic.
Step 6: Installation Complete
After successful installation, you'll see the completion screen with next steps:
Step 4: Installation Complete
What you'll see on completion:
- Backend URL for Laravel API
- Instructions to start development server
- Confirmation of successful installation
Step 7: Start Frontend Development Server
After backend installation completes, start the frontend development server:
cd C:wamp64wwwaccounting-systemfrontend
# Start development server
npm run dev
Expected output:
➜ Local: http://localhost:5174/
➜ Network: use --host to expose
Keep this terminal open during development. The frontend will automatically connect to your backend API.
Step 8: Access Your Application
Open your browser and navigate to the frontend URL:
Default Admin Login:
| Field | Value |
|---|---|
| [email protected] | |
| Password | 12345678 |
What's Auto-Created During Installation
| Component | Description | Status |
|---|---|---|
| Database | MySQL database with all tables | Auto-created |
| Admin User | Super administrator account | Auto-created |
| Environment Files | Backend and frontend configuration | Auto-generated |
| Application Key | Laravel security key | Auto-generated |
| Database Tables | All required accounting tables | Auto-migrated |
| Initial Data | Seed data for quick start | Auto-seeded |
| Fiscal Years | Financial year configuration | Auto-configured |
Other items by this author
Future product updates
Quality checked by Codester
Lowest price guarantee
|
PHP Script Installation Service
Don't worry about the installation of your script! Have your PHP Script installed for you.
|
$39 | Buy now |
| Category | Scripts & Code / PHP Scripts / Finance / Management |
| First release | 10 February 2026 |
| Last update | 10 February 2026 |
| Software version | PHP 8.1, PHP 8.2 |
| Files included | .php, .css, .html, .sql, Javascript .js |
| Software framework | VueJS, Laravel |
| Tags | small business, erp, invoicing, accounting software, billing system, income statement, bookkeeping, balance sheet, financial reports, php mysql, cash flow, laravel accounting, voucher management, ledger, trial balance |