Disbursement Payout bridge for NICEPayDisbursement Payout bridge for NICEPay
WordPress admin plugin for NICEPAY bank disbursements with dual-control approvals, transaction history, and secure callbacks.Disbursement Payout bridge for NICEPay
WordPress admin plugin for NICEPAY bank disbursements with dual-control approvals, transaction hi...
Screenshots


Overview
Disbursement Payout Bridge for NICEPAY is a WordPress admin plugin for managing bank payout disbursements through NICEPAY. It is designed for teams that need a controlled workflow: staff create payout requests, a different user approves them, and everyone can track transaction status from the dashboard.
The plugin runs entirely inside wp-admin (no public front-end forms). It supports Indonesian banks, single payout forms, and bulk CSV import (up to 200 rows per file).
When "Automatically" mode is enabled with valid NICEPAY credentials, the plugin connects to NICEPAY Sandbox or Production APIs and accepts signed server-to-server notification callbacks. When "Manually" mode is selected, requests and approvals are handled locally without outbound NICEPAY API calls—useful for training, QA, or offline workflow.
DOCUMENTATION INCLUDED WITH THE PLUGIN
• readme.txt and README.md in the plugin package
• Full step-by-step guide: WordPress admin → Payout Bridge → Guide
For marketplace review, see also the separate files: How to install.txt and User guide.txt (and screenshots / demo video if provided).
Features
• Dashboard — Request and transaction summaries; optional NICEPAY balance display (Automatically mode with valid credentials).
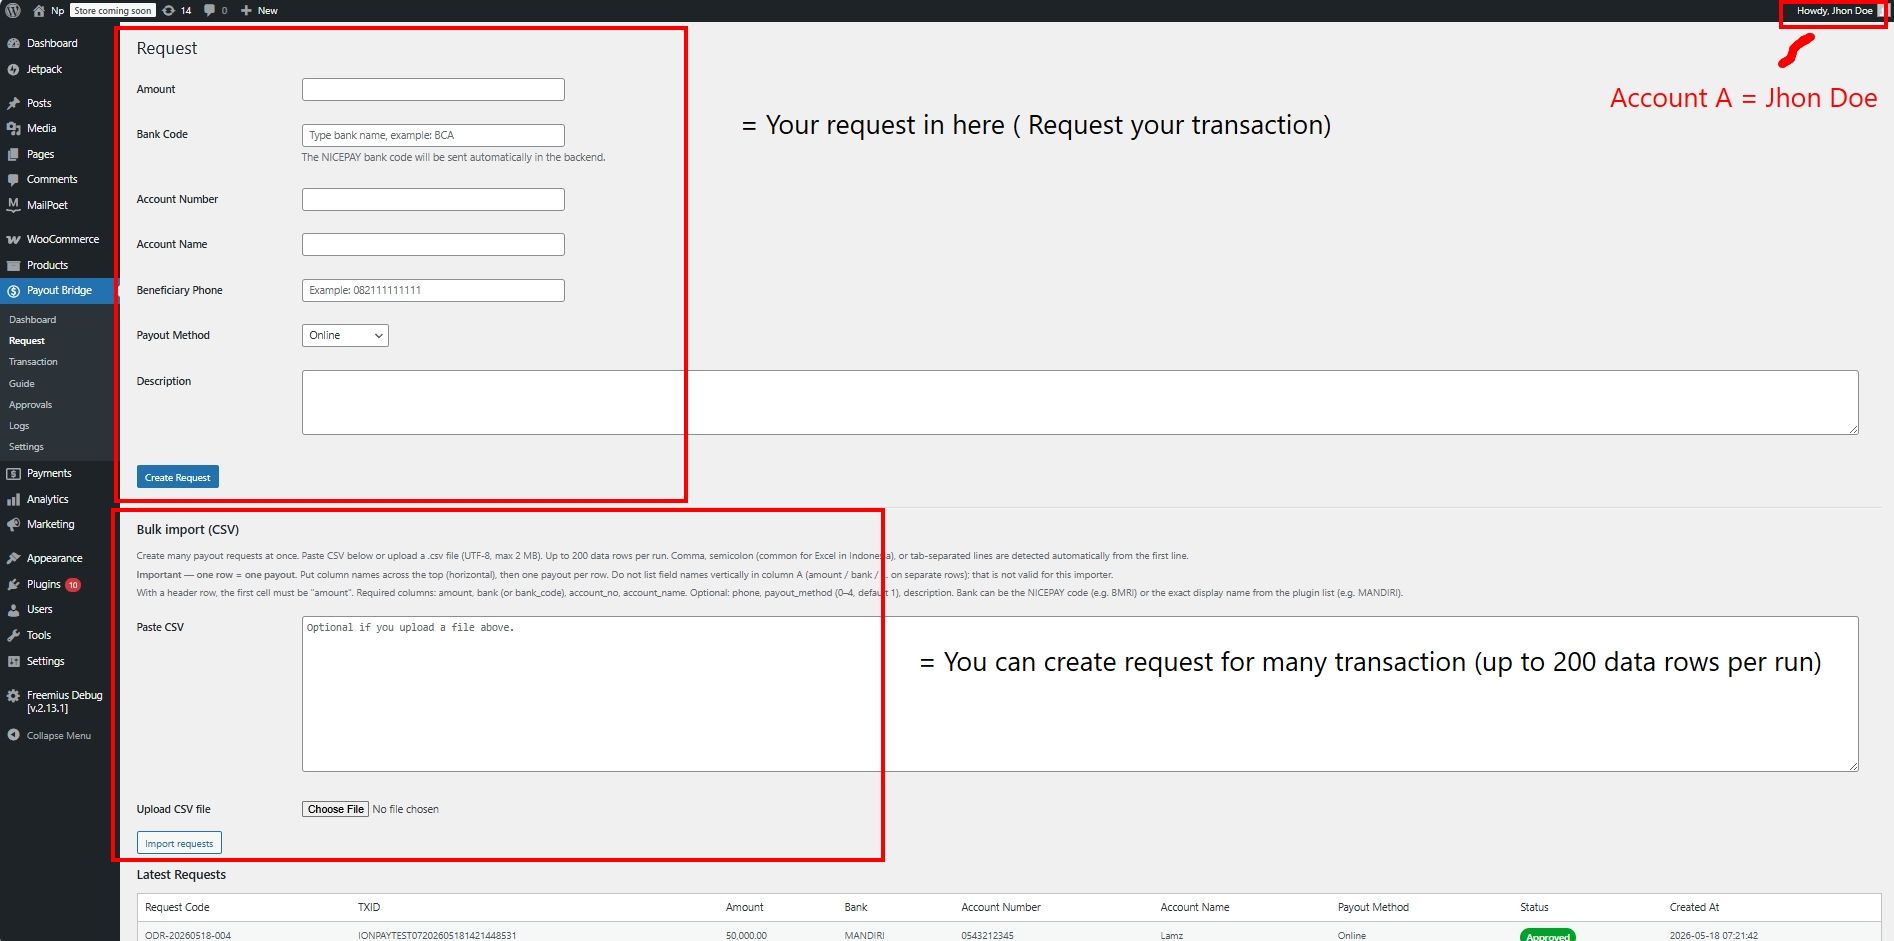
• Request — Create individual payouts (amount, bank, account number, account name, phone, payout method, description) or import many requests via UTF-8 CSV.
• Approvals — Review and approve or reject pending requests. Separation of duties: the user who created a request cannot approve or reject that same request.
• Transaction — Search and filter payout history. Masked Excel export (Today / 1 Week / 1 Month) for users with approval permission only.
• Settings — Operating mode (Manually / Automatically), environment (Sandbox / Production), NICEPAY credentials, notification callback URL, API logging toggle, and optional transaction retention.
• Logs — Masked API request/response timeline when API logging is enabled (administrators).
• Guide — In-plugin operator documentation (Payout Bridge → Guide).
OPERATING MODES
Manually
Local create/approve workflow. No outbound calls to NICEPAY.
Automatically
Full NICEPAY integration: register payout, approve/reject, balance inquiry, notification handling, and payout inquiry.
Requirements
REQUIREMENTS
• WordPress 5.8 or higher
• PHP 7.4 or higher
• HTTPS recommended for production (admin access and NICEPAY callbacks)
• NICEPAY merchant credentials for Sandbox and/or Production (when using Automatically mode)
Instructions
Disbursement Payout Bridge for NICEPAY
Version 1.0.7
================================================================================
PART A — INSTALL THE PLUGIN
================================================================================
REQUIREMENTS (before you start)
• WordPress 5.8 or higher
• PHP 7.4 or higher
• MySQL/MariaDB (standard WordPress database)
• HTTPS strongly recommended on production sites (protects admin login and NICEPAY callbacks)
STEP 1 — UPLOAD
1. Download or unzip the plugin package.
2. Upload the plugin folder to:
wp-content/plugins/
(Use the folder name provided in your distribution package.)
STEP 2 — ACTIVATE
1. Log in to WordPress as an Administrator.
2. Go to Plugins.
3. Find "Disbursement Payout Bridge for NICEPAY" and click Activate.
On activation the plugin automatically:
• Creates custom database tables (requests, transactions, logs)
• Grants payout capabilities to the Administrator role:
- lamz_manage_disbursment
- lamz_approve_disbursment
STEP 3 — CONFIRM THE MENU
After activation you should see a new top-level admin menu:
Payout Bridge
Submenus:
Dashboard | Request | Transaction | Guide | Approvals | Logs | Settings
If the menu does not appear, your user account needs Administrator access or the capabilities above.
================================================================================
PART B — FIRST-TIME CONFIGURATION (SETTINGS)
================================================================================
Go to: Payout Bridge → Settings
STEP 4 — CHOOSE OPERATING MODE
Mode:
• Manually — Create and approve requests inside WordPress only. No outbound NICEPAY API calls. Use for training, QA, or offline workflow.
• Automatically — Connects to NICEPAY for register, approve, reject, balance, notifications, and inquiry.
Recommendation: Start with Manually until your team understands the workflow, then switch to Automatically with Sandbox credentials.
STEP 5 — CHOOSE ENVIRONMENT (when using Automatically)
Environment:
• Sandbox — Testing (API host: dev.nicepay.co.id)
• Production — Live payouts (API host: www.nicepay.co.id)
Use Sandbox first. Switch to Production only when NICEPAY has approved your live credentials.
STEP 6 — ENTER NICEPAY CREDENTIALS (Automatically mode)
Enter the values from your NICEPAY merchant contract for the selected environment:
• Merchant ID
• Channel ID
• Client Key
• Merchant Key
• Private Key
Important:
• Sandbox and Production credentials are different. Do not mix them.
• Keep Merchant Key and Private Key confidential. Do not share them in support tickets or screenshots.
Optional:
• Dashboard Logo — Display image on the Dashboard (cosmetic only).
STEP 7 — REGISTER THE NOTIFICATION CALLBACK (Automatically mode)
On the Settings page, find the Notification section and copy the Callback URL. Example format:
https://YOUR-DOMAIN/wp-json/disbursment/v1/notification
1. Log in to your NICEPAY merchant portal.
2. Register this exact URL for payout notifications.
3. Ensure the environment in NICEPAY matches Sandbox or Production in the plugin Settings.
The plugin verifies every notification using NICEPAY merchantToken:
merchantToken = SHA256( Merchant ID + referenceNo + amt + Merchant Key )
Invalid or missing tokens are rejected (HTTP 403). There is no option to skip verification.
STEP 8 — API LOGGING (optional)
Checkbox: "Store masked NICEPAY API request and response payloads in Logs"
• Recommended ON during Sandbox testing and development.
• Recommended OFF on Production unless you are actively troubleshooting.
When logging is off, full API payloads are not stored. Short approval notes may still be recorded.
STEP 9 — TRANSACTION RETENTION (optional)
Set "Transaction retention (months)" to automatically delete old transaction rows.
• 0 = keep all transactions (default).
Click Save Changes.
================================================================================
PART C — PREPARE USERS (DUAL CONTROL)
================================================================================
For a secure approval workflow, use TWO different WordPress accounts:
• User A — Creates payout requests (needs lamz_manage_disbursment)
• User B — Approves or rejects requests (needs lamz_approve_disbursment)
By default, Administrators receive both capabilities on activation.
Rule: The user who created a pending request CANNOT approve or reject that same request. Another user must do it.
To assign capabilities to non-Administrator staff, use a role editor plugin (for example Members or User Role Editor):
• Finance staff who only create requests → lamz_manage_disbursment
• Supervisors who only approve → lamz_approve_disbursment
================================================================================
PART D — QUICK TEST AFTER INSTALL
================================================================================
TEST WITH MANUALLY MODE (no NICEPAY API)
1. Settings → Mode: Manually → Save.
2. Log in as User A → Payout Bridge → Request → fill the form → Create Request.
3. Log in as User B → Payout Bridge → Approvals → Approve the request.
4. Payout Bridge → Transaction → confirm the record appears.
TEST WITH AUTOMATICALLY MODE (Sandbox)
1. Settings → Mode: Automatically, Environment: Sandbox, enter Sandbox credentials, enable API logging, Save.
2. Register the Callback URL in the NICEPAY Sandbox portal.
3. User A → Request → create a small test payout.
4. User B → Approvals → Approve.
5. Wait for NICEPAY notification (or check Transaction status after inquiry).
6. Payout Bridge → Logs → review masked API entries if logging is enabled.
If something fails, see User guide.txt → Troubleshooting.
| Category | Plugins / WordPress / Miscellaneous |
| First release | 18 May 2026 |
| Last update | 18 May 2026 |
| Files included | .php, .css, Javascript .js |
| Tags | payment gateway, plugin, transfer, payout, disbursement |